< Back ×
My Vehicle Change Vehicle
2000 Cadillac Escalade
< Back to View All
Fuel Systems
- Department
- Brands
- Prices


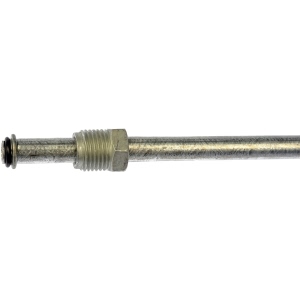
Dorman® Outlet Fuel Line Connector for 2000 Cadillac Escalade
PartNumber: 800-153Product Specifications- Notes: Outlet; M16 x 1.50 Thread; 3/8" Tubing; Steel Line Gasket; Pkg Quantity: 1; Packaging Type: Bag;Inlet; M16 x 1.50 Thread; 3/8" Tubing; Steel Line Gasket; Pkg Quantity: 1; Packaging Type: Bag
- Fitting Attachment End 1: Male O-ring - M16-1.5
- Fitting Attachment End 2: None
- Fitting Size End 1: 16 mm
- Fitting Size End 2: 3/8''
- Fuel Line Connector Design: Male O-ring
- Gasket Material: Rubber
- Material: Steel
- UPC: 019495026112
- Part Description: Outlet Fuel Line Connector
$13.59
FAQ for Fuel Line Repair
Q: How do you install the filter to the tank?
A:
You need to install the fuel feed and return pipes into the retaining clips, install the fuel tank, connect the fuel feed and return pipes to the fuel filter and the return pipe union and lower the vehicle. Then refill the fuel system, tighten the fuel filler cap, connect the negative battery cable and inspect for fuel leaks.
By Bob
GM Specialist
01/11/2022Q: What is the recommended torque for the rear fuel pipe bracket retaining bolt?
A:
The recommended torque is 6 N.m (53 lb in.).
By Bob
GM Specialist
01/11/2022Q: What is the recommended torque for the fuel pipe retainer nuts?
A:
The recommended torque is 3 N.m (27 lb in.).
By Bob
GM Specialist
01/11/2022Q: How do you remove the filter from the tank?
A:
You need to disconnect the negative battery cable, relieve the fuel system pressure and clean all the fuel pipe connections and the surrounding areas before disconnecting the pipes to avoid possible contamination of the fuel system. Drain the fuel tank, raise the vehicle and disconnect the fuel feed and return pipe fittings at the fuel filter and the return pipe union. Remove the fuel tank and the fuel feed and return pipes from the retaining clips.
By Bob
GM Specialist
01/11/2022Q: How do you remove the fuel vapor pipes?
A:
You need to disconnect the negative battery cable, relieve the fuel system pressure and raise the vehicle. Disconnect the fittings at the engine compartment fuel feed and return pipes, the fuel pipe attaching hardware, and the fuel feed and return pipe fittings at the fuel filter and the return pipe union. Remove the fuel tank, disconnect the fuel and vapor pipes and remove the fuel pipe unions in front of the cross member, the hardware retaining section of pipe to be replaced, the section of pipe and hoses, and rust or burrs from the engine compartment fuel pipes.
By Bob
GM Specialist
01/11/2022Q: How do you remove the engine compartment?
A:
You need to disconnect the negative battery cable, relieve the fuel system pressure and remove the air cleaner outlet duct. Loosen the fuel and EVAP pipe retainer nut at the bell housing stud, disconnect the chassis fuel feed and return pipes at the engine compartment fuel feed and return pipes and remove the injector fuel feed and return pipe retainer nuts, the injector fuel feed and return pipe retainer and the rear fuel pipe bracket retaining bolt. Then pull straight up on the fuel pipes, remove the O-ring seals from both ends of the fuel feed and return pipes and discard the O-ring seals.
By Bob
GM Specialist
01/11/2022Q: How do you remove the chassis?
A:
You need to disconnect the negative battery cable, relieve the fuel system pressure and clean all the fuel pipe connections and the surrounding areas before disconnecting the pipes to avoid possible contamination of the fuel system. Disconnect the fuel feed and return pipes from the engine fuel pipes, remove the upper bell housing stud and the fuel pipe clip and raise the vehicle. Then disconnect the fuel pipes from the attaching hardware and the fuel feed and return pipe fittings at the fuel filter and the return pipe union and remove the fuel feed and return pipes.
By Bob
GM Specialist
01/11/2022Q: How do you install the fuel vapor pipes?
A:
You need to connect the fuel feed and return pipes to the engine fuel pipes and the fuel pipe attaching hardware, position the new fuel pipe harness in the original location and fuel pipe harness attaching hardware and remove protective caps from one end of both fuel pipes. Leave caps on the other end of the pipes to prevent dirt from entering. Apply a few drops of clean engine oil to the male connector tube ends, connect the fuel feed pipe to the fuel filter and the return pipe to the union, the quick-connect fittings at the fuel feed and return pipes, and the vapor pipes at the fuel sender assembly and the fuel pipe unions in front of the crossmember. Next, install the fuel tank and attaching hardware, if the tank was removed. Then tighten the fuel filler cap, connect the negative battery cable and inspect for fuel leaks.
By Bob
GM Specialist
01/11/2022Q: How do you install the chassis?
A:
You need to install the fuel feed and return pipes, lower the vehicle and connect the fuel feed and return pipes to the engine fuel pipes. Install the fuel pipe clip and the upper bell housing stud, raise the vehicle and install the fuel pipes into the fuel pipe attaching hardware. Connect the fuel feed and return pipes to the fuel filter and the return pipe union, lower the vehicle and tighten the fuel filter cap. Then connect the negative battery cable and inspect for fuel leaks.
By Bob
GM Specialist
01/11/2022See more FAQs (4)

