< Back ×

My Vehicle Change Vehicle
2010 Chevrolet Express 3500
< Back to View All
Door Handles, Locks & Related Parts
- Department
- Brands
- Prices
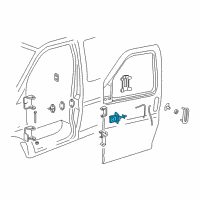
OEM (Genuine) 2010 Chevrolet Express 3500 Check Arm
PartNumber: 22768928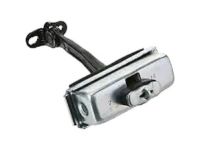 Product Specifications
- Location: Driver Side
- Other Names: Check Arm
- Item Dimensions: 6.0 x 4.7 x 1.4 inches
- Item Weight: 1.00 Pounds
- Fitment Type: Direct Replacement
- Replaces: 15025089, 15076499, 15248166, 25755390, 15188687, 15826450
- Part Description: 2010 Chevrolet Express 3500 Check Arm
Vehicle Fitment- 2010 Chevrolet Express 3500 | Base, LS, LT | 4 Cyl 2.8 L DIESEL, 6 Cyl 4.3 L FLEX, 6 Cyl 4.3 L GAS, 8 Cyl 4.8 L FLEX, 8 Cyl 4.8 L GAS, 8 Cyl 5.7 L BI-FUEL, 8 Cyl 5.7 L CNG, 8 Cyl 5.7 L GAS, 8 Cyl 6.0 L CNG, 8 Cyl 6.0 L FLEX, 8 Cyl 6.0 L GAS, 8 Cyl 6.5 L DIESEL, 8 Cyl 6.6 L DIESEL, 8 Cyl 6.6 L GAS, 8 Cyl 7.4 L GAS, 8 Cyl 8.1 L GAS
$76.30 MSRP:$115.12You Save: $38.82 (34%)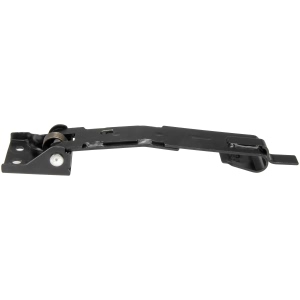

Dorman® OE Solutions Rear Driver Side Door Check for 2010 Chevrolet Express 3500
PartNumber: 924-156Product Specifications- Notes: Side Swing-Out Door; Packaging Type: Box
- Attachment Method: Bolt On
- Length: 5.11 In.
- OE Part Number: 15750877
- Thickness: 0.25 In.
- UPC: 019495434702
- Width: 1.39 In.
- Part Description: 2010 Chevrolet Express 3500 OE Solutions Rear Driver Side Door Check
Vehicle Fitment- 2010 Chevrolet Express 3500 | All Trims | All Engines
$60.39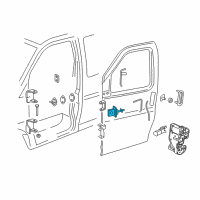
OEM (Genuine) 2010 Chevrolet Express 3500 Check Arm
PartNumber: 22768927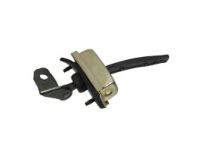 Product Specifications
- Location: Passenger Side
- Other Names: Check Arm
- Item Dimensions: 6.0 x 4.7 x 1.3 inches
- Item Weight: 1.00 Pounds
- Fitment Type: Direct Replacement
- Replaces: 25755389, 15025090, 15188686, 15076498, 15826449, 15248165
- Part Description: 2010 Chevrolet Express 3500 Check Arm
Vehicle Fitment- 2010 Chevrolet Express 3500 | Base, LS, LT | 4 Cyl 2.8 L DIESEL, 6 Cyl 4.3 L FLEX, 6 Cyl 4.3 L GAS, 8 Cyl 4.8 L FLEX, 8 Cyl 4.8 L GAS, 8 Cyl 5.7 L BI-FUEL, 8 Cyl 5.7 L CNG, 8 Cyl 5.7 L GAS, 8 Cyl 6.0 L CNG, 8 Cyl 6.0 L FLEX, 8 Cyl 6.0 L GAS, 8 Cyl 6.5 L DIESEL, 8 Cyl 6.6 L DIESEL, 8 Cyl 6.6 L GAS, 8 Cyl 7.4 L GAS, 8 Cyl 8.1 L GAS
$66.54 MSRP:$100.40You Save: $33.86 (34%)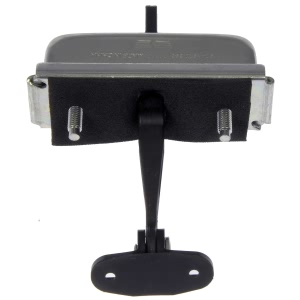
Dorman® OE Solutions Front Passenger Side Door Check for 2010 Chevrolet Express 3500
PartNumber: 924-920Product Specifications- Bushing Included: No
- Cutting Required: No
- Installation Hardware Included: No
- Installation Instructions Included: No
- Length: 4.14 in
- Mounting Hole Diameter: 0.16 in
- Mounting Hole Quantity: 2
- OE Part Number: 15826449, 15826450
- Package Contents: 1 Door Check
- UPC: 019495440284
- Width: 1.39 in
- Part Description: 2010 Chevrolet Express 3500 OE Solutions Front Passenger Side Door Check
Vehicle Fitment- 2010 Chevrolet Express 3500 | All Trims | All Engines
$31.46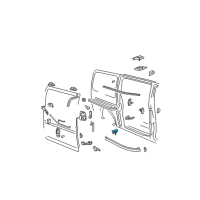
OEM (Genuine) 2010 Chevrolet Express 3500 Door Check
PartNumber: 84509133 Product Specifications
- Notes: Sliding Type
- Other Names: Door Check
- Item Dimensions: 4.0 x 3.6 x 2.6 inches
- Fitment Type: Direct Replacement
- Replaces: 20945472, 15966353
- Part Description: 2010 Chevrolet Express 3500 Door Check
Vehicle Fitment- 2010 Chevrolet Express 3500 | Base, LS, LT | 4 Cyl 2.8 L DIESEL, 6 Cyl 4.3 L FLEX, 6 Cyl 4.3 L GAS, 8 Cyl 4.8 L FLEX, 8 Cyl 4.8 L GAS, 8 Cyl 5.7 L BI-FUEL, 8 Cyl 5.7 L CNG, 8 Cyl 5.7 L GAS, 8 Cyl 6.0 L CNG, 8 Cyl 6.0 L FLEX, 8 Cyl 6.0 L GAS, 8 Cyl 6.5 L DIESEL, 8 Cyl 6.6 L DIESEL, 8 Cyl 6.6 L GAS, 8 Cyl 7.4 L GAS, 8 Cyl 8.1 L GAS
$32.25 MSRP:$50.73You Save: $18.48 (37%)
FAQ for Door Check Repair
Q: What is the removal procedure for the front side door check link?
A:
The procedure is to remove the front door trim panel, the front door water deflector, the bolts that retain the door link to the door jamb, the nuts that retain the door link to the door, and the door link from the door.
By Bob
GM Specialist
01/11/2022Q: What is the installation procedure for the rear side door center track bumper?
A:
The procedure is to install the sliding door stop to the vehicle, the nut retaining the sliding stop to the body, and the passenger side body side trim panel,.
By Bob
GM Specialist
01/11/2022Q: What is the installation procedure for the rear side door lower track?
A:
The procedure is to install the sliding side door lower track to the vehicle, the bolts that retain the sliding side door lower track to the vehicle, the sliding side door lower roller bracket, and the sliding side door check assembly.
By Bob
GM Specialist
01/11/2022Q: What is the recommended torque for the nuts?
A:
The recommended torque is 11 Nm (97 lb in).
By Bob
GM Specialist
01/11/2022Q: How do you remove the rear side door check?
A:
You need to remove the side door stepwell mat, the bolts that retain the check assembly cover, the check assembly cover from the stepwell, the nuts that retain the check assembly to the sliding side door lower track, and the check assembly from the sliding side door lower track.
By Bob
GM Specialist
01/11/2022Q: How do you install the front side door check strap?
A:
You can install the side door check strap into the door, hook the strap to the pin inside of the door, pull the strap, and then install the fasteners.
By Bob
GM Specialist
01/11/2022Q: What is the installation procedure for the front side door check strap seal?
A:
The procedure is to apply weatherstrip adhesive to the check strap seal and then install the side front door check strap seal to the door.
By Bob
GM Specialist
01/11/2022Q: What is the installation procedure for the rear-side door check?
A:
The procedure is to install the check assembly to the sliding side door lower track, the nuts, and the side door stepwell mat.
By Bob
GM Specialist
01/11/2022Q: How do you remove the rear side door lower track?
A:
You need to remove the sliding side door check assembly, the sliding side door lower roller bracket, the bolts that retain the sliding side door lower track to the vehicle, and the sliding side door lower track from the vehicle.
By Bob
GM Specialist
01/11/2022Q: How do you remove the front side door check strap seal?
A:
You need to use 3M General Purpose Adhesive Cleaner 3M P/N 08987 or the equivalent and then clean the side front door of all of the old adhesive.
By Bob
GM Specialist
01/11/2022See more FAQs (18)