< Back ×
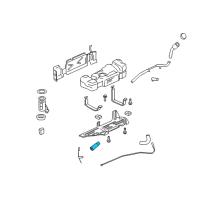
2009 Chevrolet Trailblazer Fuel Line Connector
My Vehicle Change Vehicle
2009 Chevrolet Trailblazer
< Back to View All
Fuel Systems
- Department
- Prices
 $55.89 MSRP:
$87.90You Save: $32.01 (37%)Product Specifications- Notes: 2005-09
- Other Names: Connector Hose, Filler Hose
- Item Dimensions: 4.8 x 2.6 x 2.3 inches
- Item Weight: 0.70 Pounds
- Fitment Type: Direct Replacement
- Part Description: 2009 Chevrolet Trailblazer Filler Hose
Vehicle Fitment- 2009 Chevrolet Trailblazer | Base, LS, LT, SS | 6 Cyl 4.2 L GAS, 8 Cyl 5.3 L GAS, 8 Cyl 6.0 L GAS
 Product Specifications
- Notes: 2005-09
- Other Names: Connector Hose
- Item Dimensions: 7.2 x 3.1 x 1.5 inches
- Item Weight: 0.70 Pounds
- Fitment Type: Direct Replacement
- Part Description: 2009 Chevrolet Trailblazer Hose Asm-Fuel Tank Filler (Upper)
Vehicle Fitment- 2009 Chevrolet Trailblazer | Base, LT, SS | 6 Cyl 4.2 L GAS, 8 Cyl 5.3 L GAS, 8 Cyl 6.0 L GAS
FAQ for Fuel Line Connector Repair
Q: How to remove the Metal Collar Quick Connect Fitting?
A:
First, you need to relieve the fuel system pressure before servicing any fuel system connection, remove the retainer from the quick-connect fitting, and blow dirt out of the fitting using compressed air. Then, please choose the correct tool from the J 37088-A for the size of the fitting, Insert the tool into the female connector, and push inward to release the locking tabs. Finally, you should pull the connection apart, use a clean shop towel to wipe off the male pipe end, and inspect both ends of the fitting for dirt and burrs.
By Bob
GM Specialist
01/11/2022Q: How to install the Metal Collar Quick Connect Fitting?
A:
First, you need to apply a few drops of clean engine oil to the male pipe end. Then, please push both sides of the fitting together to snap the retaining tabs into place. Finally, you should pull on both sides of the fitting to make sure the connection is secure, and install the retainer to the quick-connect fitting.
By Bob
GM Specialist
01/11/2022Q: How to remove the Plastic Collar Quick Connect Fitting?
A:
First, you need to relieve the fuel system pressure and blow any dirt out of the quick-connect fitting. Then, please squeeze the plastic quick connect fitting release tabs (Bartholomew style connectors ONLY), or release the fitting by Pushing the tab toward the other side of the slot in the fitting (Que Release style connectors ONLY), or squeeze where indicated by arrows on both sides of the plastic ring surrounding the quick connect fitting (Squeeze to Release style connectors ONLY), or release the fitting by pressing on one side of the release tab causing it to push in slightly (Sliding Retainer style connectors ONLY), or release the fitting by pressing on the tab indicated by arrow (Push Down TI style connectors ONLY). Finally, you should pull the connection apart.
By Bob
GM Specialist
01/11/2022Q: How to install the Plastic Collar Quick Connect Fitting?
A:
First, you need to apply a few drops of clean engine oil to the male connection end. Then, please push both sides of the quick-connect fitting together to cause the retaining feature to snap into place. Finally, you should pull on both sides of the quick-connect fitting to make sure the connection is secure.
By Bob
GM Specialist
01/11/2022