< Back ×

My Vehicle Change Vehicle
2009 Chevrolet Silverado 2500 HD
< Back to View All
Alternators, Batteries & Starters
- Department
- Prices
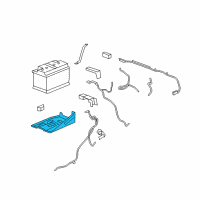
OEM (Genuine) 2009 Chevrolet Silverado 2500 HD Battery Tray
PartNumber: 25826079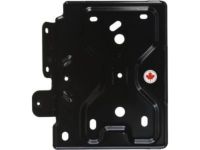 Product Specifications
- Location: Driver Side
- Other Names: Battery Tray
- Item Dimensions: 18.7 x 13.4 x 12.5 inches
- Item Weight: 2.20 Pounds
- Fitment Type: Direct Replacement
- Replaces: 15947428, 15925342, 15892230, 15871114
- Part Description: 2009 Chevrolet Silverado 2500 HD Battery Tray
Vehicle Fitment- 2009 Chevrolet Silverado 2500 HD | LT, LTZ, WT | 8 Cyl 6.0 L CNG, 8 Cyl 6.0 L FLEX, 8 Cyl 6.0 L GAS, 8 Cyl 6.6 L DIESEL
$25.31 MSRP:$41.91You Save: $16.60 (40%)
OEM (Genuine) 2009 Chevrolet Silverado 2500 HD Tray Asm, Body Battery
PartNumber: 15872637 Product Specifications
- Location: Passenger Side
- Other Names: Battery Tray
- Item Dimensions: 4.6 x 16.4 x 11.9 inches
- Item Weight: 4.50 Pounds
- Fitment Type: Direct Replacement
- Part Description: 2009 Chevrolet Silverado 2500 HD Tray Asm, Body Battery
Vehicle Fitment- 2009 Chevrolet Silverado 2500 HD | LT, LTZ, WT | 8 Cyl 6.0 L CNG, 8 Cyl 6.0 L FLEX, 8 Cyl 6.0 L GAS, 8 Cyl 6.6 L DIESEL
FAQ for Battery Trays Repair
Q: How many bolts does the auxiliary battery tray have?
A:
The auxiliary battery tray has a total of 8 bolts.
By Bob
GM Specialist
28/10/2022Q: How do you install the Battery Tray?
A:
You can install the battery tray, install the battery tray to battery tray reinforcement bolts, install the battery tray support bolts, install the battery tray to auxiliary BEC bolt, install the positive and negative battery cables and install the battery.
By Bob
GM Specialist
28/10/2022Q: What is the recommended torque when you tighten the auxiliary battery tray bolts?
A:
You can tighten the bolts to 9 Nm (80 lb in).
By Bob
GM Specialist
28/10/2022Q: What is the removal procedure for the Battery Tray?
A:
The procedure is to remove the battery, reposition the positive and negative battery cables out of the way, remove the battery tray to battery tray reinforcement bolts, remove the battery tray to battery tray support bolts, remove the battery tray to auxiliary bussed electrical center (BEC) bolt and remove the battery tray.
By Bob
GM Specialist
28/10/2022Q: What should you remove before replacing the Auxiliary Battery Tray?
A:
You should remove the auxiliary battery.
By Bob
GM Specialist
28/10/2022