< Back ×
My Vehicle Change Vehicle
2009 Cadillac XLR
< Back to View All
Cooling Systems, Fans & Radiators
- Department
- Brands
- Prices


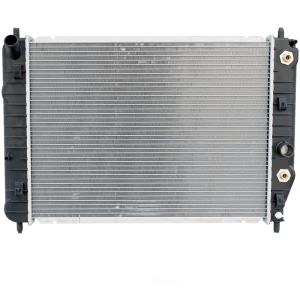
Denso® Engine Coolant Radiator for 2009 Cadillac XLR
PartNumber: 221-9393Product Specifications- Core Height: 23.4300"
- Core Thickness: 0.9800"
- Core Width: 18.5000"
- Inlet Diameter: 1.3130"
- Outlet Diameter: 1.3200"
- UPC: 042511225992
- Part Description: 2009 Cadillac XLR Engine Coolant Radiator
Vehicle Fitment- 2009 Cadillac XLR | All Trims | 8 Cyl 4.6L
$134.87OEM (Genuine) 2009 Cadillac XLR Radiator
PartNumber: 10346017 Product Specifications
- Notes: Xlr; 4.6 Liter; 4.4 Liter
- Other Names: Radiator
- Item Dimensions: 36.4 x 28.1 x 8.5 inches
- Item Weight: 10.40 Pounds
- Fitment Type: Direct Replacement
- Replaces: 21996497
- Part Description: 2009 Cadillac XLR Radiator
Vehicle Fitment- 2009 Cadillac XLR | Base, Platinum, V | 8 Cyl 4.4 L GAS, 8 Cyl 4.6 L GAS


Spectra Premium® Complete Radiator for 2009 Cadillac XLR
PartNumber: CU2715Product Specifications- Cap Included: No
- Core Charge Applicable: No
- Core Height: 23.4375; 595
- Core Material: Aluminum
- Core Thickness: 1.0000; 26
- Core Width: 17.25; 438
- Depth: 1.0
- Fan Included: No
- Height: 23.4375
- Inlet Header Length: TBD
- Inlet Header Width: TBD
- Installation Hardware Included: 1 x Installation Sheet
- Integrated Engine Oil Cooler: No
- Integrated Transmission Oil Cooler: Yes
- Internet Product Code (IPC): 74A1846F23A
- Item Grade: OEM Standard
- Item has MSDS (SDS): N
- MFG Brand Name: Spectra Premium
- MFG Model # (Series): CU2715
- MFG Name: Spectra Premium Industries
- Outlet Header Length: TBD
- Package Contents: 1 Radiator 1 Installation Kit
- Product Information Video Link - URL: http://www.youtube.com/spectrapremiumvideos
- Product Installation Video Link - URL: http://www.youtube.com/spectrapremiumvideos
- Radiator Core Material: Aluminum
- Radiator Inlet Diameter: 1.313
- Radiator Outlet Diameter: 1.313
- Radiator Style: Crossflow
- Radiator Tank Material: Plastic
- Supplier Company Name: Spectra Premium Industries
- Tank Material: Plastic
- Transmission Oil Cooler Distance between Fittings: 12.0000
- Transmission Oil Cooler Included: Yes
- Transmission Oil Cooler Type: Plated
- UPC: 671607750331
- Width: 17.25
- Part Description: 2009 Cadillac XLR Complete Radiator
Vehicle Fitment- 2009 Cadillac XLR | All Trims | 8 Cyl 4.6L
- 2009 Cadillac XLR | All Trims | 8 Cyl 4.4L
FAQ for Radiator Repair
Q: What is the radiator air baffle assemblies and front air deflector installation procedure?
A:
Install the front air deflector and the front air deflector bolts and tighten the bolts to 2.5 Nm. Next, install the front air deflector upper mounting screws and tighten them to 2.5 Nm. After that install the LH radiator air baffle lower screws and tighten the screws to 2.5 Nm. Finally, install the RH radiator baffle lower screw and tighten it to 2.5 Nm.
By Bob
GM Specialist
01/11/2022Q: How many clips does the radiator grille have?
A:
The radiator grille has 6 bezel clips in total.
By Bob
GM Specialist
01/11/2022Q: What is the radiator installation procedure?
A:
First, install the radiator to the vehicle and engage the generator cooling hose clamp at the radiator. Next, connect the lower transmission oil cooler line and the radiator outlet hose to the radiator. Engage tension on the radiator outlet hose clamp and connect the upper transmission oil cooler line to the radiator. Connect the surge tank inlet hose, and connect the cooling fan and shroud assembly to the radiator. Install the radiator inlet hose.
By Bob
GM Specialist
01/11/2022Q: What should you do before you replace the radiator grille?
A:
You should remove the front bumper fascia from the vehicle.
By Bob
GM Specialist
01/11/2022Q: What is the radiator air baffle assemblies and radiator air baffle installation procedure?
A:
Install the radiator air baffle and the RH radiator baffle upper retainer pin. Next, install the RH/LH side air deflector retainer pins, install the RH radiator air baffle lower screws, and tighten the bolts to 2.5 Nm. Next, install the LH radiator air baffle lower screws and tighten to 2.5 Nm. Install the ambient air temperature sensor and install the cruise control bracket.
By Bob
GM Specialist
01/11/2022Q: What is the radiator support installation procedure?
A:
Install the radiator support, and the radiator support bolts and tighten to 9 Nm. Next, connect the surge tank inlet hose assembly and the MAF sensor wire to the radiator support retainer clip. Finally, install the air cleaner assembly.
By Bob
GM Specialist
01/11/2022Q: How many screws does the grille have?
A:
The grille has 7 bezel screws and 6 fascia screws.
By Bob
GM Specialist
01/11/2022See more FAQs (2)


