< Back ×

My Vehicle Change Vehicle
2001 GMC Savana 1500
< Back to View All
Interior & Exterior Trim
- Department
- Prices
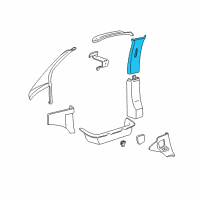
OEM (Genuine) 2001 GMC Savana 1500 Molding Asm-Center Pillar Upper Garnish *Neutral Medium
PartNumber: 15075429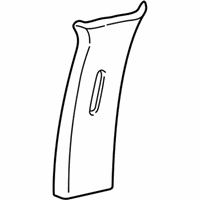 Product Specifications
- Notes: Upper, Panel Van
- Location: Passenger Side
- Other Names: Lock Pillar Trim
- Item Dimensions: 4.2 x 25.7 x 10.2 inches
- Item Weight: 2.80 Pounds
- Fitment Type: Direct Replacement
- Replaces: 15158272, 15030941
- Part Description: 2001 GMC Savana 1500 Molding Asm-Center Pillar Upper Garnish *Neutral Medium
Vehicle Fitment- 2001 GMC Savana 1500 | Base, SLT | 6 Cyl 4.3 L GAS, 8 Cyl 5.0 L GAS, 8 Cyl 5.7 L GAS
$24.94 MSRP:$50.32You Save: $25.38 (51%)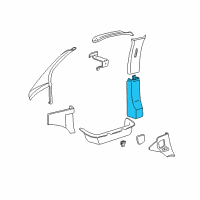
OEM (Genuine) 2001 GMC Savana 1500 Molding Asm-Center Pillar Garnish *Tm1065
PartNumber: 15030877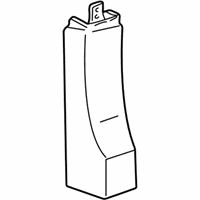 Product Specifications
- Notes: Lower, Passenger Van
- Location: Driver Side
- Other Names: Lock Pillar Trim
- Item Dimensions: 30.8 x 10.7 x 7.3 inches
- Item Weight: 1.60 Pounds
- Fitment Type: Direct Replacement
- Part Description: 2001 GMC Savana 1500 Molding Asm-Center Pillar Garnish *Tm1065
Vehicle Fitment- 2001 GMC Savana 1500 | Base, SLE, SLT | 6 Cyl 4.3 L GAS, 8 Cyl 5.0 L GAS, 8 Cyl 5.7 L GAS
OEM (Genuine) 2001 GMC Savana 1500 Molding Asm-Center Pillar Lower Garnish *Pewter
PartNumber: 15762196Product Specifications- Notes: Lower, Panel Van;Lower, Passenger Van
- Location: Passenger Side
- Other Names: Lock Pillar Trim
- Item Dimensions: 28.7 x 8.2 x 6.7 inches
- Item Weight: 1.20 Pounds
- Fitment Type: Direct Replacement
- Part Description: 2001 GMC Savana 1500 Molding Asm-Center Pillar Lower Garnish *Pewter
Vehicle Fitment- 2001 GMC Savana 1500 | Base, SLE, SLT | 6 Cyl 4.3 L GAS, 8 Cyl 5.0 L GAS, 8 Cyl 5.7 L GAS
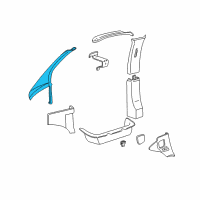
OEM (Genuine) 2001 GMC Savana 1500 Molding Asm-Windshield Garnish <Use 1C2N*Tm1030
PartNumber: 15021306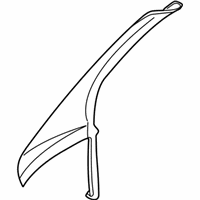 Product Specifications
- Location: Passenger Side
- Other Names: Weatherstrip Pillar Trim
- Item Dimensions: 41.2 x 23.1 x 6.5 inches
- Item Weight: 1.00 Pounds
- Fitment Type: Direct Replacement
- Part Description: 2001 GMC Savana 1500 Molding Asm-Windshield Garnish <Use 1C2N*Tm1030
Vehicle Fitment- 2001 GMC Savana 1500 | Base, SLT | 6 Cyl 4.3 L GAS, 8 Cyl 5.0 L GAS, 8 Cyl 5.7 L GAS
OEM (Genuine) 2001 GMC Savana 1500 Molding Asm-Center Pillar Upper Garnish *Vy Dark Pewter
PartNumber: 15075431Product Specifications- Notes: Upper, Passenger Van
- Location: Passenger Side
- Other Names: Lock Pillar Trim
- Item Dimensions: 28.4 x 10.6 x 5.5 inches
- Item Weight: 2.60 Pounds
- Fitment Type: Direct Replacement
- Replaces: 15158268, 15026880
- Part Description: 2001 GMC Savana 1500 Molding Asm-Center Pillar Upper Garnish *Vy Dark Pewter
Vehicle Fitment- 2001 GMC Savana 1500 | Base, SLE, SLT | 6 Cyl 4.3 L GAS, 8 Cyl 5.0 L GAS, 8 Cyl 5.7 L GAS
OEM (Genuine) 2001 GMC Savana 1500 Molding Asm-Center Pillar Garnish *Tm1065
PartNumber: 15030867Product Specifications- Notes: Lower, Panel Van
- Location: Driver Side
- Other Names: Lock Pillar Trim
- Item Dimensions: 29.4 x 10.1 x 12.1 inches
- Item Weight: 1.90 Pounds
- Fitment Type: Direct Replacement
- Part Description: 2001 GMC Savana 1500 Molding Asm-Center Pillar Garnish *Tm1065
Vehicle Fitment- 2001 GMC Savana 1500 | Base, SLE, SLT | 6 Cyl 4.3 L GAS, 8 Cyl 5.0 L GAS, 8 Cyl 5.7 L GAS
OEM (Genuine) 2001 GMC Savana 1500 Molding Asm-Center Pillar Upper Garnish *Vy Dark Pewter
PartNumber: 15075435Product Specifications- Notes: Upper, Passenger Van
- Location: Driver Side
- Other Names: Lock Pillar Trim
- Item Dimensions: 25.3 x 15.9 x 6.0 inches
- Item Weight: 1.40 Pounds
- Fitment Type: Direct Replacement
- Part Description: 2001 GMC Savana 1500 Molding Asm-Center Pillar Upper Garnish *Vy Dark Pewter
Vehicle Fitment- 2001 GMC Savana 1500 | Base, SLT | 6 Cyl 4.3 L GAS, 8 Cyl 5.0 L GAS, 8 Cyl 5.7 L GAS
OEM (Genuine) 2001 GMC Savana 1500 Molding Asm-Center Pillar Upper Garnish *Neutral Medium
PartNumber: 15075425Product Specifications- Notes: Upper, Panel Van
- Location: Driver Side
- Other Names: Lock Pillar Trim
- Item Dimensions: 28.8 x 16.6 x 14.1 inches
- Item Weight: 5.70 Pounds
- Fitment Type: Direct Replacement
- Replaces: 15158273, 15030935
- Part Description: 2001 GMC Savana 1500 Molding Asm-Center Pillar Upper Garnish *Neutral Medium
Vehicle Fitment- 2001 GMC Savana 1500 | Base, SLT | 6 Cyl 4.3 L GAS, 8 Cyl 5.0 L GAS, 8 Cyl 5.7 L GAS
OEM (Genuine) 2001 GMC Savana 1500 MOLDING, Windshield Garnish & Reveal
PartNumber: 15021305Product Specifications- Location: Driver Side
- Other Names: Weatherstrip Pillar Trim
- Fitment Type: Direct Replacement
- Part Description: 2001 GMC Savana 1500 MOLDING, Windshield Garnish & Reveal
Vehicle Fitment- 2001 GMC Savana 1500 | Base, SLT | 6 Cyl 4.3 L GAS, 8 Cyl 5.0 L GAS, 8 Cyl 5.7 L GAS
FAQ for Pillar Panels Repair
Q: How to install the body rear corner trim panel on the right side?
A:
You need to install the passenger side rear corner trim panel, align the tabs at the front of the passenger side rear corner trim panel, and press the passenger side rear corner trim panel at the rear to engage the retaining clips.
By Bob
GM Specialist
02/11/2022Q: How to install the side door opening frame garnish molding?
A:
You need to install the side door opening frame garnish molding, press on the side door opening frame garnish molding, and install the passenger side front corner garnish molding and the front door upper pillar garnish molding.
By Bob
GM Specialist
02/11/2022Q: What is the removal procedure for the front side door opening frame garnish?
A:
You need to remove the windshield garnish molding, grasp and gently pull the front door opening upper frame garnish molding to release the retaining clips, remove the front door opening upper frame garnish molding, and inspect the front door opening upper frame garnish molding.
By Bob
GM Specialist
02/11/2022Q: What is the removal procedure for the body side rear trim panel?
A:
You need to remove the rear passenger seats, grasp and gently pull the body side rear trim panel to disengage the retaining clips, remove the body side rear trim panel, and inspect the body side rear trim panel for the broken or missing retaining clip.
By Bob
GM Specialist
02/11/2022Q: How to install the body side front garnish molding on the left side?
A:
You need to install the left body side upper garnish molding, press on the left body side upper garnish molding to engage the retaining clips, install the left body side upper trim panel, the body side rear upper garnish molding, and the driver side front door upper pillar garnish molding.
By Bob
GM Specialist
02/11/2022Q: How to install the body side trim panel on the right side?
A:
You need to install the passenger side body side trim panel, position the trim panel, press on the trim panel to engage the retaining clips, and install the passenger side rear corner trim panel and the rear passenger seats.
By Bob
GM Specialist
02/11/2022Q: What is the removal procedure for the body hinge pillar trim panel?
A:
You need to pull the hinge pillar trim panel to release the retaining clips, remove the hinge pillar trim, and inspect the hinge pillar trim panel for broken or missing retaining clips.
By Bob
GM Specialist
02/11/2022Q: What is the removal procedure for the lower pillar garnish molding?
A:
You need to remove the front door upper pillar garnish molding, the seat belt through the slot in the front lower pillar garnish molding, and the 2 screws from the garnish molding, grasp and gently pull the front door lower pillar garnish molding to release the retaining clips, remove the front door lower pillar garnish molding, and inspect the front door lower pillar garnish molding.
By Bob
GM Specialist
02/11/2022Q: What is the removal procedure for the body side rear upper garnish molding?
A:
You need to grasp and gently pull down to disengage the body side rear upper garnish molding from the retaining clip, remove the body side rear upper garnish molding, and inspect the body side rear upper molding.
By Bob
GM Specialist
02/11/2022Q: What is the removal procedure for the center pillar upper garnish molding on the right side?
A:
You need to remove the passenger side body side trim panel and the passenger side body side rear upper garnish molding, grasp and gently pull the passenger side front corner garnish molding down to disengage the retaining clips, slip the seat belt through the slot in the passenger side front corner garnish molding, remove the passenger side front corner garnish molding, and inspect the passenger side front corner garnish molding.
By Bob
GM Specialist
02/11/2022See more FAQs (47)