< Back ×

My Vehicle Change Vehicle
2001 Chevrolet Venture
< Back to View All
Hoods
- Department
- Prices
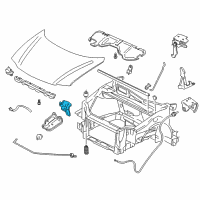
OEM (Genuine) 2001 Chevrolet Venture Lock
PartNumber: 10319846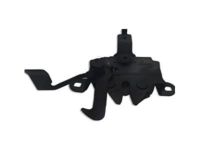 Product Specifications
- Other Names: Lock
- Item Dimensions: 8.1 x 5.8 x 5.5 inches
- Item Weight: 1.50 Pounds
- Fitment Type: Direct Replacement
- Replaces: 10447444, 16619835
- Part Description: 2001 Chevrolet Venture Lock
Vehicle Fitment- 2001 Chevrolet Venture | Base, LS, LT, Plus, Value, Warner Bros. | 6 Cyl 3.4 L GAS
FAQ for Hood Latch Repair
Q: How to remove the seal-hood rear?
A:
You need to open and support the hood, remove the hood rear weatherstrip from the pinch-weld flange, remove the hood rear outer seals from the fenders, then clean the old adhesive with 3M(TM) P/N 8984 adhesive remover or equivalent in the area of the hood outer seals to ensure proper adhesion of adhesive.
By Bob
GM Specialist
01/11/2022Q: What is the proper way to install the hood primary latch?
A:
You should install the primary hood latch support bracket, install the bolts to the primary hood latch at the latch support bracket, connect the hood release cable, and adjust the hood.
By Bob
GM Specialist
01/11/2022Q: What kind of special tools will be required in the replacement of the hood front seal?
A:
The tools required include J 38778 Door Trim Pad and Garnish Clip Remover.
By Bob
GM Specialist
01/11/2022Q: What is the proper way to install the seal-hood rear?
A:
You should apply new adhesive GM P/N 12345096 if you are reusing the old hood rear weatherstrips, install the hood rear weatherstrip to the flange, install the hood rear outer seals to the fenders, press into place until fully seated to the fender, and close the hood.
By Bob
GM Specialist
01/11/2022Q: How to remove the hood hinge?
A:
You need to position the hood hinge to the marks on the upper fender rail, install the bolts to the hood hinge at the upper fender rail, and install the hood.
By Bob
GM Specialist
01/11/2022Q: How to remove the hood primary latch?
A:
You need to open and support the hood, disconnect the hood release cable, remove the bolts from the primary hood latch at the latch support bracket, and remove the primary hood latch from the support bracket.
By Bob
GM Specialist
01/11/2022Q: What is the recommended torque for the bolts retaining on the hood hinge at the upper fender rail?
A:
The recommended torque is 25 N.m (18 lb-ft).
By Bob
GM Specialist
01/11/2022Q: What is the proper way to install the hood latch support?
A:
You should install the hood latch support to the upper tie bar, install the bolts to the hood latch support at the upper tie bar, and install the primary hood latch.
By Bob
GM Specialist
01/11/2022Q: What is the proper way to install the hood secondary latch?
A:
You should install the secondary hood latch, install the secondary hood latch linkage to the hood latch, then install the secondary hood latch bolts, then close the hood.
By Bob
GM Specialist
01/11/2022Q: How to remove the hood secondary latch?
A:
You need to open and support the hood, remove the secondary hood latch-to-hood bolts, remove the secondary hood latch linkage from the latch, and remove the secondary hood latch from the hood.
By Bob
GM Specialist
01/11/2022See more FAQs (10)